

A small puddle outside a frameless shower usually starts as an annoyance. You wipe it up, assume someone splashed a little too hard, and move on. Then it shows up again the next day, and the day after that.
Most of the time, the problem isn't the glass. It's the seal. Frameless shower door seal replacement is one of those maintenance jobs homeowners rarely think about until the bathroom floor reminds them. Done right, it restores the clean look of the enclosure and stops water from escaping where it shouldn't.
Why Your Frameless Shower Door Is Leaking
The clear strip at the bottom or side of a frameless shower door looks minor, but it does important work. It directs water back into the enclosure, closes the gap between moving glass and fixed surfaces, and helps protect flooring, grout lines, trim, and adjacent walls from repeated moisture exposure.
That strip also wears out. Shower door seals aren't permanent parts. Industry guidance puts replacement on a routine cycle of about 1 to 5 years depending on material quality and usage, and that matters even more in hot, humid, high-use areas such as Southwest Florida where proactive replacement helps prevent water damage, according to Aston Bath's shower seal guidance.
What wear looks like in real bathrooms
In the field, the first signs are usually easy to miss:
- Cloudiness or discoloration that makes the seal look older than the glass around it
- Stiffness when you touch the sweep or flex the fins
- Cracks or splitting at the corners or along the drip edge
- Shrinkage that leaves a small open gap at one end
- Persistent puddling after normal use, even when the showerhead is aimed correctly
Southwest Florida speeds up this cycle. Humidity hangs in the room longer. Hard-water residue builds faster. Daily use in family homes, seasonal rentals, and coastal properties gives these parts very little downtime.
Practical rule: If the seal is brittle, misshapen, or leaving repeat puddles, treat it like a maintenance item, not a mystery leak.
A lot of homeowners assume a leak means something failed dramatically. Usually it doesn't. A worn seal is closer to weatherstripping on an exterior door. It's expected to age, and replacing it protects the larger investment around it.
That mindset helps. Instead of worrying that your frameless enclosure is defective, you can treat the issue the way remodelers and maintenance teams do. Inspect it, measure it, replace what's worn, and keep the enclosure performing the way it should.
If you're planning broader bathroom updates along with maintenance, this essential guide for Melbourne homeowners offers useful renovation context on how bathroom details affect long-term performance and finish quality. For shower-specific questions about fit, hardware, or service issues, AmeriGlass also answers many common concerns in its shower and glass FAQ page.
Choosing the Right Seal and Gathering Your Tools
Most failed DIY seal swaps don't fail because the installer lacked effort. They fail because the wrong profile was ordered, the glass wasn't measured carefully, or the replacement material wasn't suited to the bathroom environment.
For frameless shower door seal replacement, fit comes before brand. You need the right glass thickness, the right gap coverage, and the right orientation for the seal style you're buying.
Start with identification, not shopping
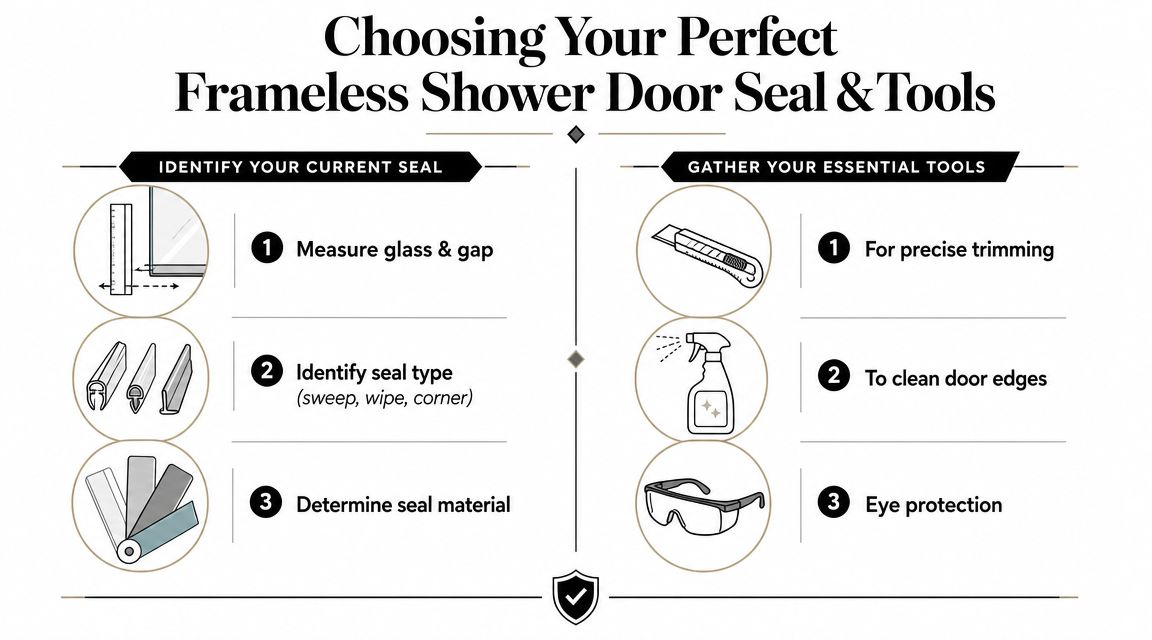
Before buying anything, inspect the old part and answer three questions:
- How does it attach? Some seals clip onto the glass edge. Others are adhesive-backed. Some framed applications use screws, though many frameless bottom sweeps are press-on styles.
- Where is it installed? Bottom sweeps, side seals, strike seals, and magnetic closures solve different leak paths.
- What gap is it meant to manage? A bottom sweep that's too short or too shallow won't control splash. One that's oversized can drag, curl, or make the door close poorly.
Replacement guides consistently advise measuring glass thickness and gap profile rather than shopping by door brand alone, and they recommend confirming whether the old part clips on, sticks on, or screws on before you cut a new strip, as outlined in this fitment guide from Plano Bath.
Material matters in coastal bathrooms
In Southwest Florida, I'd rather see a homeowner choose the correct material once than replace a bargain strip over and over. Basic PVC seals are common, but humid, coastal bathrooms are hard on them. A higher-quality silicone or coated seal can cut maintenance and replacement frequency by resisting mold and stiffening from heat and moisture, as noted in McDowell Glass's frameless shower seal guide.
That doesn't mean every shower needs the same upgrade. It means you should match the material to the room:
| Seal choice | Where it works well | Common trade-off |
|---|---|---|
| Basic vinyl or PVC | Standard bathrooms with moderate use | Can stiffen sooner in heat and moisture |
| Silicone | High-humidity bathrooms and daily-use showers | Usually costs more upfront |
| Coated seal options | Homes where easier cleaning matters | Selection can be narrower by profile |
The tool kit that actually gets used
You don't need a van full of equipment. You do need the right basics on hand before you remove the old strip.
- Tape measure or caliper for checking glass thickness and the gap you need to cover
- Sharp utility knife or cutters for trimming a field-length seal cleanly
- Microfiber cloths so lint doesn't get trapped under the new piece
- Isopropyl alcohol for final surface prep
- Eye protection if you're trimming rigid material
- A sample or photo of the old profile when ordering replacements
If you want to compare available enclosure parts and related glass components before ordering, AmeriGlass lists product categories at its glass and shower product page.
The Step-by-Step Seal Replacement Process
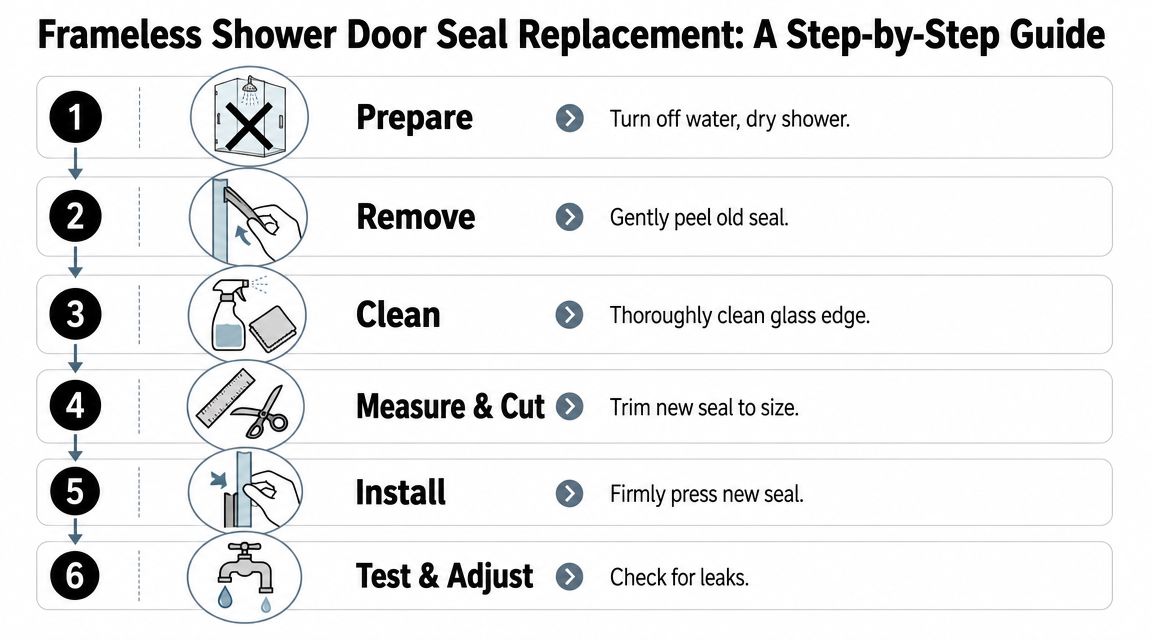
This job goes smoothly when you slow down at the two places people usually rush. First, removal. Second, cleaning. The actual install is the easy part once the glass edge is clean and your cut length is right.
A good visual reference helps before you start.
Removing the old seal
Open the door fully so you can work straight across the edge without twisting the glass. Then grip one end of the old seal and pull steadily. If it's brittle, don't jerk it. Old vinyl likes to break into pieces, especially near corners.
If the strip resists, work it off a little at a time rather than forcing it. The goal is to remove the seal without torquing the glass or chipping an edge.
A reliable workflow is to remove the old seal, clean the glass thoroughly, measure the length, and cut the new seal only after the surface is ready. For a watertight fit, the drip edge needs to face inward toward the shower, and the new seal should be installed only on completely clean, dry glass, based on this frameless replacement workflow from Glass Seals.
Clean glass is what holds the alignment. Dirt, soap film, and hard-water scale are what make a new seal slip, twist, or sit crooked.
Prepping the glass for a perfect fit
This is the part that separates a quick patch from a leak-free result. Once the old strip is off, inspect the bottom edge of the glass and both ends. If you feel any rough residue, keep cleaning. A new seal installed over mineral buildup won't sit fully seated.
Use a microfiber cloth and a residue-cutting cleaner first. Then wipe with isopropyl alcohol for the final pass. Let the glass dry completely before test-fitting the new part.
Pay attention to the threshold too. If the curb has soap buildup, the water path can fool you into thinking the seal failed when the underlying issue is runoff deflecting in the wrong direction.
Here's the prep sequence I trust most:
- Open the door fully so you can work square to the edge
- Strip off all old material including any tiny broken sections near the corners
- Remove residue completely from the glass edge and adjacent contact points
- Dry the area fully before dry-fitting the new seal
- Inspect the curb and strike area so a hidden buildup doesn't mimic a leak
Measuring and trimming like a pro
Many homeowners struggle to achieve a precise fit. Don't assume the opening is perfectly even. Measure at multiple points because curbs and tile lines aren't always consistent, especially in older showers or remodels built over existing floors.
One practical method is to trim the new seal slightly long at first, then fine-tune it. Guides on frameless seal replacement recommend measuring at several points and note that starting a seal about 1 to 2 mm longer can help avoid end gaps that compromise watertight performance, as described in the earlier-referenced workflow.
Dry-fit before the final cut if the profile allows it. Most replacement strips are sold long so you can trim them to custom widths. That's useful, but it also means the final result depends on your knife work.
Installing the new seal
Start at one end and press the seal on in short sections. Don't try to shove the whole length on at once. That's how you create waves, bubbles, and a lip that doesn't sit straight.
Keep checking three things as you go:
| Check | What you want | What causes trouble |
|---|---|---|
| Alignment | Strip stays straight along the glass edge | Twisting the seal while pressing |
| Seating | Full contact with no lifted spots | Residue left on the glass |
| Orientation | Drip lip or fins point into the shower | Backward installation that sends water out |
Once the strip is seated, close the door slowly and watch for rubbing. If the sweep drags hard on the threshold, the profile may be too tall or installed slightly skewed. If there's daylight at one end, remove it and correct the cut before testing.
A quick video can help you compare your hand position and pacing with a standard install.
Testing before you call it done
Run a controlled water test instead of waiting for tomorrow's shower to tell you the truth. Spray along the door, not just at the center. Watch the hinge side, the latch side, and both corners at the threshold.
If the seal stays in place, the drip edge throws water inward, and the floor remains dry, the job is finished. If not, don't assume the new part is defective. The next step is diagnosis.
Solving Common Leaks and Installation Pitfalls
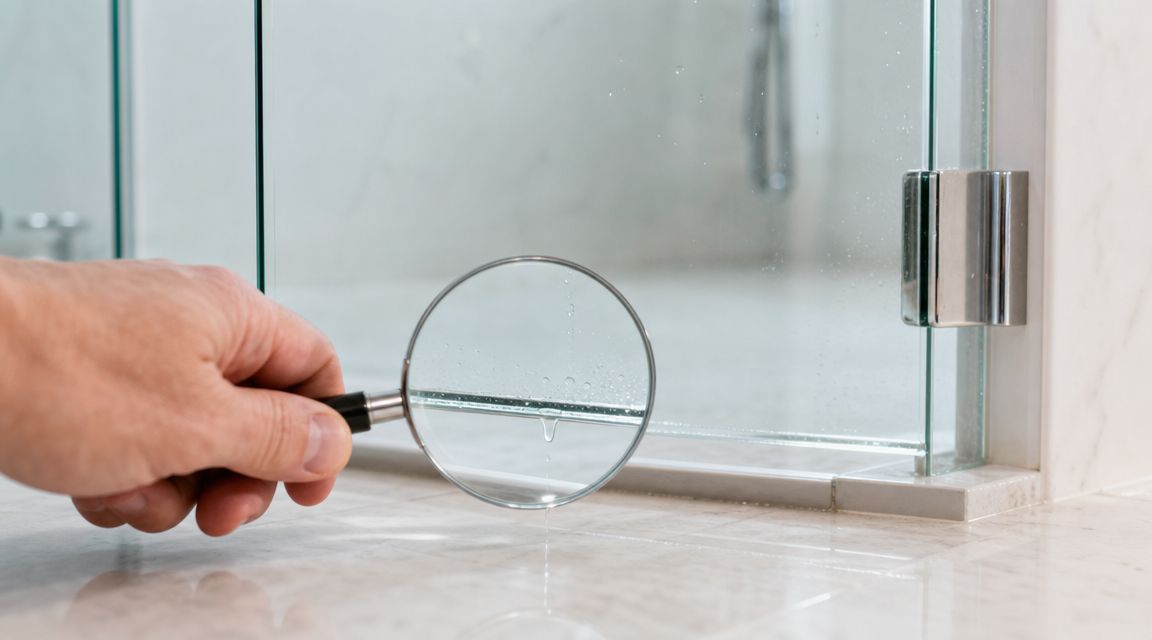
A new sweep doesn't fix every leak. That's the mistake generic guides make. They treat all water outside the shower as a seal problem, when in practice the leak pattern tells you where to look first.
Read the leak pattern before replacing parts
The location of the water matters.
Bottom-center drips usually do point to a worn bottom sweep. But hinge-side spray or threshold overflow often means something else is going on. According to ANZZI's leak diagnosis guide, a bottom-center drip suggests a worn sweep, while hinge-side leaks or overflow can signal a misaligned door or the wrong seal profile, which a new bottom seal alone won't correct.
That distinction saves a lot of wasted effort.
Common reasons a new seal still leaks
- The door has shifted and no longer closes evenly across the curb
- The threshold is out of level so water migrates toward one corner
- The replacement profile is wrong for the size or shape of the gap
- The seal was cut too short and leaves an open end
- The strip is backward so the lip sends water out instead of in
- Only one leak path was addressed when the shower also needs a side or jamb seal
If water is escaping near the hinge or strike side, stop blaming the bottom sweep first.
A few field checks that help
You don't need specialty diagnostics to catch many of these issues. Open and close the door slowly. Watch whether the gap stays consistent. Look at the reveal between the glass and the fixed panel or wall. If one end tightens while the other opens, the door may need adjustment.
Try a simple paper test at the bottom contact area. If one section compresses and another doesn't, the door or threshold relationship may be uneven. Also look for rubbing sounds, a door that self-swings unexpectedly, or a gap that changes when you gently move the handle.
For enclosures where spray escapes beyond the main door opening, fixed panels sometimes need an accessory barrier rather than another sweep. In those cases, products such as fixed splash guards for shower enclosures can address water path issues that a bottom seal won't solve by itself.
DIY Cost and Time vs Professional Precision
A straightforward seal swap is one of the more approachable shower maintenance tasks. If the door is aligned, the profile match is correct, and the old strip comes off cleanly, many homeowners can handle it without much drama.
The trade-off is that DIY only stays simple when the leak really is simple.
Where DIY makes sense
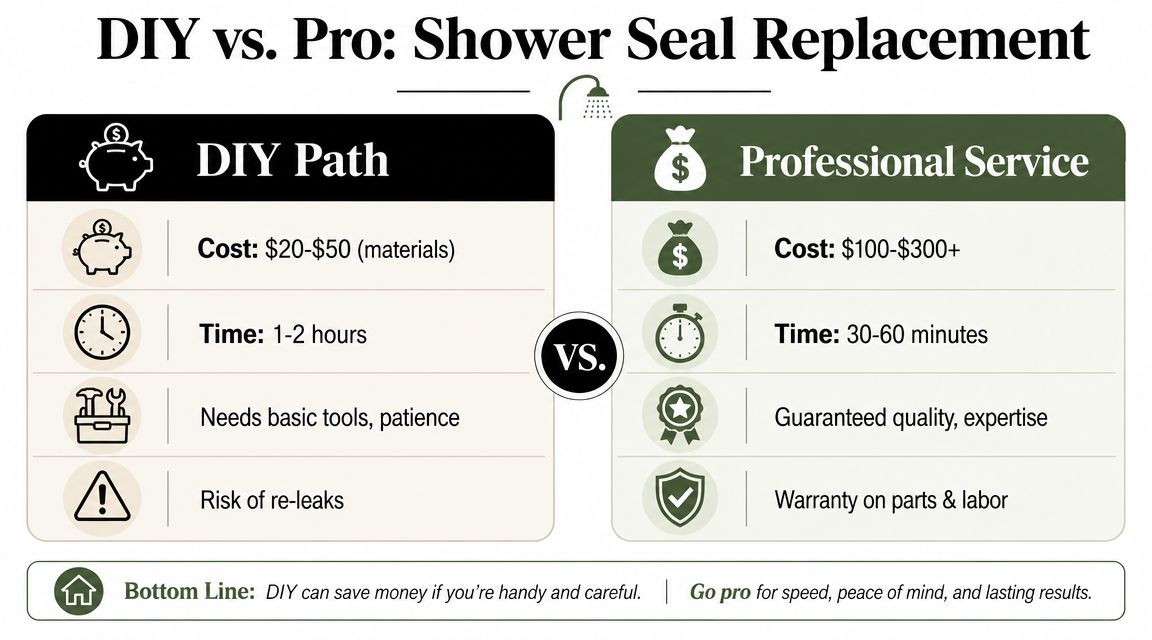
If you already identified a worn or cracked sweep, have the correct replacement in hand, and the door operates smoothly, doing it yourself is reasonable. Material costs are usually modest, and the tool list is short.
What takes time isn't the pressing-on part. It's the measuring, trimming, cleaning, test-fitting, and second-guessing the cut before you commit.
Where a pro earns the call
Professional help pays for itself when the leak source is uncertain, the door has movement, or the enclosure is part of a higher-end bath where you don't want trial and error around finished glass and tile.
HOROW notes that a professional can often complete the job in about 5 to 15 minutes, and that a properly measured and fitted new seal can reduce leaks by about 95%, according to its shower bottom seal replacement guide. That number matters because this job is all about fit. A seal that's almost right is often still wrong.
Here's the practical comparison:
| Option | Best for | Main risk or benefit |
|---|---|---|
| DIY replacement | Clear wear-and-tear with an obvious failed seal | Wrong profile or a bad cut can leave you with the same leak |
| Professional service | Unclear leak source, door movement, luxury finishes | Better diagnosis, faster install, fewer repeat fixes |
AmeriGlass handles shower door repair and service work as one option for homeowners who want measurement, fit verification, and adjustment addressed together. If you're deciding whether to do it yourself or hand it off, a request through the AmeriGlass quote page is a practical next step.
Maintaining Your New Seal and When to Call Us
A new seal lasts longer when you keep it clean and don't let soap film and hard-water residue harden on it. Squeegee water back into the shower after use, wipe the seal with a soft cloth during routine cleaning, and skip abrasive pads or harsh chemicals that can scratch or stiffen the material.
It also helps to check the strip periodically with the door open. Look for shrinking at the ends, curling fins, or a drip lip that no longer sits straight. If the seal looks fine but water is still escaping, the issue may have moved beyond simple wear.
For broader bathroom moisture issues, drainage symptoms, or situations where the leak may not be coming from the enclosure at all, homeowners sometimes benefit from related guidance such as MG Drain Services' plumbing advice. It's a useful reminder that not every wet bathroom floor starts and ends with glass.
Routine upkeep goes a long way, and AmeriGlass also shares practical care guidance in its shower door maintenance resource. If you're in Naples, Bonita Springs, Fort Myers, or elsewhere in Southwest Florida and want the leak fixed cleanly the first time, professional adjustment and seal replacement are often the smarter call.
If your frameless shower door is leaking, dragging, or still dripping after a DIY fix, AmeriGlass Industries can help with precise diagnosis, proper seal fitment, and professional service throughout Southwest Florida. Reach out for a free estimate and get a clean, leak-free result without the guesswork.
Leaking seals? AmeriGlass Industries replaces seals, sweeps and hardware through our shower door repair service across Naples, Fort Myers, Bonita Springs and Cape Coral. Call (239) 426-6884.