
You've got the mirror out of the box, the bathroom is half prepped, and the excitement fades the moment you see the wiring harness, mounting hardware, and installation sheet. That's the point where most homeowners realize a backlit mirror installation isn't quite the same as hanging a standard vanity mirror.
It's still manageable if the wall is straightforward, the mirror isn't oversized, and the electrical is already where it needs to be. But this is also one of those projects where small mistakes show up immediately. A bracket that's barely out of level leaves the mirror visibly crooked. Wiring pressure behind the glass can keep the unit from sitting flat. A weak anchor in tile or masonry can turn a clean upgrade into a repair job.
This guide is written the way a lead installer would walk you through it. Clear steps. Real trade-offs. Safety first. If you're capable and detail-oriented, parts of this project are within reach. If your wall is tile, concrete, or horizontally oriented, or the electrical load is questionable, you'll also know exactly where DIY should stop.
Your New Mirror Is Here Now What
The mirror is out of the box, leaning against the vanity, and the first bad decision usually happens right here. Someone grabs a drill before confirming how the unit mounts, where the wiring enters, and whether the wall can carry the load. That is how clean installs turn into chipped tile, a crooked light halo, or a mirror that never sits tight to the wall.
Start on the floor, not at the wall. Set the mirror on a padded blanket or foam and inspect the glass edges, corners, and back frame. Then locate the mounting points, power connection, and orientation markings. Some models can hang vertically or horizontally. Others are built for one direction only, and forcing the wrong layout can leave the lighting uneven or place stress where the frame was not designed to carry it.
This part matters more with backlit mirrors than standard vanity glass. You are fitting a finished electrical fixture with very little tolerance for bad measurements. If the mounting plate is off, the mirror shows it. If the wire whip or connector is crowded behind the unit, the glass may rock or stand proud at one corner.
Before you decide whether this stays a DIY job, confirm these points:
- Power type: Verify whether the unit is hardwired, plug-in, or convertible. A hardwired mirror is an electrical project, not a simple hanging job.
- Mounting system: Keyholes, Z-clips, brackets, and proprietary rails all need different hole spacing and wall prep.
- Orientation limits: Confirm whether the mirror is approved for horizontal mounting, especially on larger models where weight distribution changes.
- Wall surface: Drywall, tile, plaster, and concrete each call for different bits, anchors, and drilling technique.
- Connection location: Make sure the mirror's power entry lines up with the wall box or can reach it without pinching conductors behind the frame.
One more check is worth making early. If you are not already comfortable reading branch-circuit basics, review a plain-language guide to master 120V outlet wiring before you even assess the existing bathroom feed. It will not replace a licensed electrician, but it helps you recognize what you are looking at when you open the box.
I tell homeowners to judge the install by the wall, not by the mirror alone. A moderate-size unit on drywall with a properly placed electrical box is often manageable for a careful DIYer. The same mirror on porcelain tile, old plaster, or concrete can go sideways fast, especially if the box lands off-center or the mirror needs to be mounted horizontally.
If you are still settling on layout and style, reviewing finished mirror and specialty glass styles helps you match the design to a wall and wiring plan that will install cleanly.
Planning Your Project and Electrical Prep
A backlit mirror can look straightforward right up until the wall and the wiring start dictating the job. The trouble spots usually show up before a single mounting hole is drilled. Tile chips at the edge, a concrete wall pushes the box off center, or the mirror you planned to hang horizontally turns out to need different support than the vertical layout shown on the carton.
Start with the install height, but don't stop there. Set the mirror off the vanity centerline first, then confirm that the light band will work for the people who will use it. In bathrooms with low ceilings or soffits, leave breathing room above the frame so the unit can be mounted cleanly and serviced later if needed. I also check whether the wall box depth and cable path will let the mirror sit flat. A mirror that rocks on the wall usually has a box, connector, or wire bundle fighting for space behind it.
Measure the wall like an installer
Take these measurements before buying anchors, drilling tile, or calling for electrical work:
Vanity centerline
Mark the true center of the vanity and sink, because they are not always centered on the wall.Finished mirror size
Measure the actual glass and frame dimensions from the unit itself, not the marketing dimensions on the listing.Wall box position
Confirm where the junction box sits in relation to the mirror's power entry point and mounting hardware.Wall surface and thickness
Drywall is forgiving. Porcelain tile, old plaster, and concrete are not. Surface type changes the bit, anchor, drill speed, and margin for error.Stud layout or solid backing
Find every stud in the install zone. On larger mirrors, one stud is often not enough to make the bracket layout convenient.Horizontal mounting clearance
If the mirror is approved for horizontal installation, re-check bracket spacing, wire entry location, and side clearance before you commit.
A careful DIY installer can handle layout and prep on a friendly wall. The risk goes up fast on tile, masonry, and any job where the electrical box is not exactly where it needs to be.
Tools and materials that match the wall
| Category | Item | Pro Tip |
|---|---|---|
| Layout | Tape measure | Pull from two fixed reference points so your centerline stays consistent. |
| Layout | Painter's tape or pencil | Tape gives you visible marks on tile without marking the finish. |
| Layout | 24-inch or longer level | A short level can miss a bowed wall or uneven tile line. |
| Structure | Stud finder | Verify with a pilot hole where the wall finish allows it. |
| Structure | Anchors and screws | Match them to the wall type and the mirror's loaded weight. |
| Electrical | Voltage tester | Check the circuit before touching conductors, then check again. |
| Electrical | Wire strippers | Clean strips make better connections and fit wire nuts properly. |
| Electrical | Wire nuts | Use the correct size for the wire count and gauge. |
| Electrical | Junction box clamp | Keep the cable secured so movement does not stress the connections. |
| General | Drill and correct bits | Tile needs tile bits. Concrete needs masonry bits. Forcing the wrong bit usually damages the wall. |
| Safety | Safety glasses | Tile shards and masonry dust travel farther than people expect. |
| Protection | Drop cloth or cardboard | Protect the vanity, faucet, and floor before lifting the mirror into place. |
Electrical prep that decides whether the job goes smoothly
Hardwired backlit mirrors need more than a nearby power source. They need the right kind of box, enough depth for the connections, and a circuit that makes sense for the load and local code. In some bathrooms, especially remodeled ones, the mirror can share an existing lighting circuit. In others, a dedicated circuit is required or strongly preferred because the existing branch is already serving receptacles, fan loads, heated features, or multiple light fixtures.
That's where many DIY projects stall.
Open the wall box only after shutting off the breaker and confirming the circuit is dead with a tester. Then identify what is in that box. A simple switch leg, a feed-through with multiple cables, or a shared bathroom circuit changes the plan. If you are not comfortable sorting that out, stop before the wall gets opened further.
If you need a plain-language refresher before assessing the existing feed, review master 120V outlet wiring. It will not replace a licensed electrician, but it helps you recognize the basic branch-circuit parts when you look inside the box.
Plan for the wall you have, not the one you hoped for
Tile and concrete deserve extra caution. On tile, hole placement must be final before drilling, because patched mistakes still show. On concrete or block, the anchor choice and drilling depth matter just as much as the bracket spacing. I've seen solid mirrors fail early because the fasteners were strong enough, but the installer never accounted for an uneven substrate or a shallow box that kept the frame from sitting tight.
If the mirror needs to mount horizontally, check the manufacturer's approval and support points before any electrical rough-in is moved. Some units place the wire entry and hanging hardware in ways that work well vertically but become awkward or unsafe when rotated.
If the circuit plan, wall condition, or mirror orientation is still in question, get a professional glass and mirror installation quote before purchase or scheduling. Include the mirror size, wall material, mounting orientation, and whether a junction box already exists at the planned location.
Securely Mounting and Wiring Your Mirror
You only get one clean first hang. Miss the bracket height by a quarter inch, crowd the wiring behind the chassis, or drill the wrong spot in tile, and the mirror will show the mistake immediately.
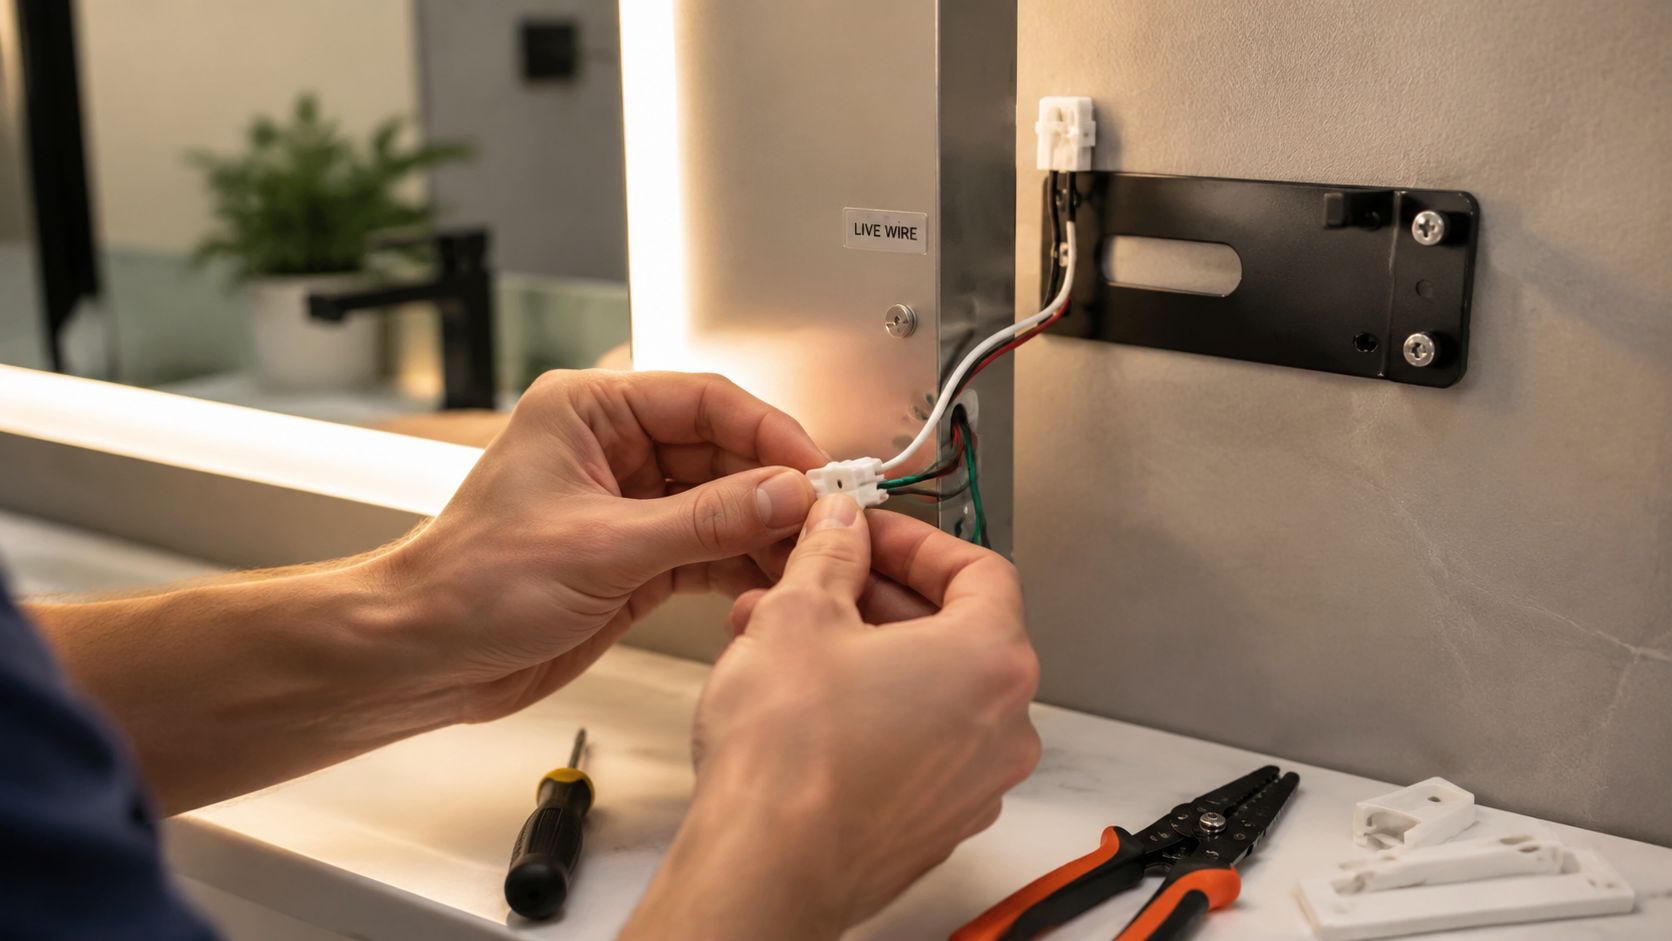
Mount the bracket to match the wall and the mirror
Start with the manufacturer's bracket dimensions, then verify them against the actual mirror before a single hole is drilled. I always dry-fit the bracket and measure from the finished floor, the vanity, and the junction box location. Bathroom walls are rarely perfectly square, and a mirror centered to the vanity can still look off if the ceiling line or tile courses run out.
Stud attachment is the best outcome. When the bracket misses framing, use anchors rated for the mirror's full installed weight and for the wall material you have. Drywall, porcelain tile over backer, hollow block, and poured concrete all need different hardware and different drilling technique.
Flatness matters as much as pull-out strength. If one tile stands proud or the wall bows at mid-span, the bracket can twist and leave the mirror rocking on the wall. Shim the bracket where the manufacturer allows it, and confirm both support points hold the same stand-off before the glass comes up.
A mounting sequence that prevents rework
Use an order that keeps layout errors from turning into broken glass:
- Mark from a level reference: Snap or draw a level line for the bracket, then transfer the exact hole centers.
- Test hole locations first: On tile, use painter's tape and confirm the bit will not land on a fragile edge or grout void.
- Set anchors fully: If an anchor spins, mushrooms wrong, or seats shallow, fix it before the mirror enters the room.
- Match screw stand-off: Keyhole mounts need equal projection or the mirror will sit crooked and stress the frame.
- Protect the area below: Pad the vanity top and faucet. One slip during the lift can chip both glass and stone.
Horizontal installs deserve extra attention here. The load spreads differently, and some mirrors have mounting rails or wire-entry points that are less forgiving when rotated. If the manufacturer approves horizontal mounting, follow those support points exactly rather than improvising a wider layout.
Wire it cleanly so the mirror can sit flush
Turn the breaker off, confirm the circuit is dead with a tester, and open the junction box. Match conductors by function, typically hot to hot, neutral to neutral, and ground to ground, using connectors sized for the wire bundle. Then fold the wires back into the box with enough slack to avoid tension, but not so much that the bundle pushes against the rear of the mirror.
That last part gets overlooked all the time.
A backlit mirror needs room behind it for the wiring path, the driver housing, and any mounting recess built into the chassis. If wire nuts, clamps, or excess cable stack in the wrong spot, the mirror may appear hung but never fully seat. That creates pressure points, uneven gaps, and sometimes a cracked mounting tab weeks later.
Secure the mirror whip or jumper cable with the proper box connector or clamp so it cannot shift during the final lift. Support the mirror while a second person guides the wiring into the recess. For larger units, that second set of hands is not optional. It prevents chipped edges and avoids dragging the wiring across sharp bracket hardware.
A quick visual walk-through can help before you make the final connections:
What changes on tile, concrete, and other problem walls
Standard drywall instructions do not carry over cleanly to finished tile or masonry. Tile needs the right bit, slow drilling, steady pressure, and accurate hole placement on the first try. Concrete and block require proper masonry anchors, correct embedment depth, and a drilled hole that is cleaned out before the fastener goes in. Skip any of that and the bracket can feel tight at first, then loosen under use.
I see two DIY mistakes repeatedly on tile. The first is letting the bit skate and chip the glaze before the hole is established. The second is drilling a perfect hole in the wrong place because the mirror and bracket were never dry-laid against the wall together. On expensive tile, a bad hole is usually permanent.
If you get paint, adhesive, or layout marks on the glass during install, clean them correctly instead of scraping blindly. This guide for removing paint from mirrors covers safe methods that will not ruin the reflective backing.
Final fit check before power goes back on
Run through a short punch list before you restore power:
- The mirror is fully seated on the bracket or lower engagement points.
- No wires are pinched between the mirror body and the wall.
- The top edge is level and the side reveals look even.
- The switch, sensor, or dimmer responds properly once the breaker is back on.
If any item fails, take the mirror back down and correct it immediately. Small fit problems become expensive callbacks once the vanity, caulk lines, and daily use hide the source.
If you are still comparing configurations, mounting styles, or hardwire layouts, review the available backlit mirror product options before committing to a model.
Troubleshooting Common Issues and Maintenance
A mirror that's mounted well usually tells you what's wrong pretty quickly. Flicker, partial lighting, or a unit that won't power on almost always points to one of a short list of causes. Start with the obvious and work toward the hidden.
If the light flickers or doesn't turn on
Loose connections are the first suspect. Shut power off and inspect the wire-nut connections at the junction box. A conductor that wasn't stripped cleanly or twisted securely can make the light behave inconsistently.
If the mirror powers up but the glow is uneven, look at any LED strip sections or internal segments that may have been stressed during installation. For direct strip mounting, the glass surface must be thoroughly cleaned and the adhesive must be pressed firmly for a strong hold. A common failure point is pinching or bunching the circuit around corners, which compromises adhesion and electrical continuity, as described in this step-by-step LED strip guide.
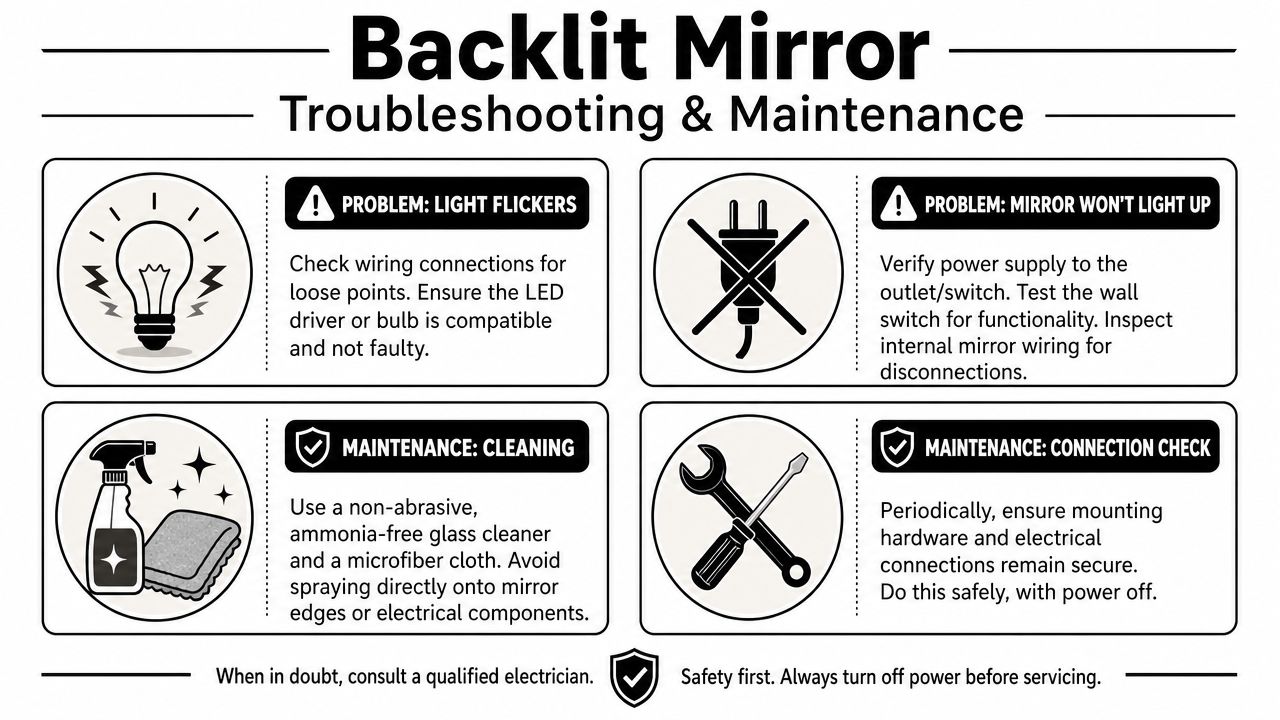
Field note: If the mirror worked before final hanging and failed after hanging, suspect a disturbed connection or wire pressure issue before you blame the mirror itself.
A simple diagnostic order
Check the switch
Make sure the wall switch is feeding the mirror.Kill power and reopen the box
Look for a loose neutral, loose hot, or a ground connection that shifted during hanging.Confirm the mirror sits flat
Pressure against the rear housing can strain internal components or connectors.Review add-on controls
Dimmers and smart controls can create compatibility issues if they weren't specified for the mirror.
Keeping the mirror looking and performing right
Maintenance is mostly about moisture control and careful cleaning. Use a non-abrasive, ammonia-free glass cleaner on a microfiber cloth. Don't spray directly into the mirror edges, switches, or electronic components. Spray the cloth, then wipe the glass.
Paint specks and remodel residue are common after bathroom work. If you're dealing with overspray or drips, this practical guide for removing paint from mirrors gives safe removal methods that won't turn a small cleanup into a scratched surface.
For long-term care, check the mounting hardware occasionally with power off. Bathrooms cycle through humidity, temperature swings, and regular vibration from doors and exhaust fans. Those conditions don't usually ruin a good install, but they can expose a marginal one.
If your bathroom includes frameless glass as well, these shower door maintenance tips pair well with mirror care and help keep the whole room looking finished.
When to Call the Pros AmeriGlass Expertise
The mirror is out of the box, the vanity light is set, and then the actual problem shows up. The wall is porcelain tile over cement board, the junction box is an inch off center, and the mirror you bought can mount horizontally only if the bracket layout is exact. That is the point where a careful DIY project often turns into chipped tile, stressed wiring, or a cracked piece of glass.

The walls most DIY guides ignore
Drywall gives you some forgiveness. Tile, concrete, and masonry do not. On tile, hole placement has to be right the first time because a bad bit, too much pressure, or a drifting pilot can spider the face. On concrete, anchor choice matters just as much as layout. Some fasteners hold well in compression but do a poor job resisting the pull forces a heavy mirror creates when the wall is not perfectly flat.
Horizontal mounting adds another layer. The hanging points change, the internal light pattern may read differently across the vanity, and a box that was "close enough" for a vertical install can end up in the wrong place. Dedicated electrical requirements can also come into play, especially in remodels where the existing vanity circuit is already feeding lights, receptacles, and fan controls. That is why advanced installs fail more often on the wall and power setup than on the mirror itself.
Where licensed electrical work makes sense
Hardwired backlit mirrors sit in the middle of two trades. They need clean mounting and correct electrical work. If the wire has to be extended, the box relocated, the switch leg reworked, or the circuit load verified, bring in a licensed electrician before the mirror is hung.
If you want a useful outside reference on fixture wiring standards and residential scope, this overview of a lighting installation electrician gives a good baseline for what that work should include.
A good rule is simple. If the job involves finished tile, concrete drilling, moving power, or a large mirror that needs two people to place safely, the labor cost is usually cheaper than replacing damaged glass or repairing the wall.
Why specialist installation matters
A mirror installer who works around glass every day looks at different details than a general handyman. We check wall flatness before the bracket goes up. We plan for the depth of the housing, wire bend space behind the mirror, and the exact fastener that matches the substrate. We also know when a mirror can be installed cleanly by a capable homeowner and when the safer call is to split the job between electrician and glass installer.
That is the kind of work our team handles every week. You can review our background, service scope, and local experience on the AmeriGlass team and company page.
Hiring a specialist keeps the project on tolerance. In bathroom finish work, small errors stay visible.
Frequently Asked Installation Questions
A lot of installation problems show up after the mirror is out of the box and halfway up the wall. The common ones are predictable. The box is off-center, the wall is not flat, the tile bit starts walking, or the mirror gets turned horizontal even though the internal layout was built for vertical mounting.
Can I install a backlit mirror myself
Sometimes, yes.
A capable homeowner can usually handle a small or mid-size mirror on drywall if the mounting points are solid, the electrical box is already in the right place, and the manufacturer's hardware is used exactly as intended. The job gets harder fast on tile, concrete, large-format mirrors, and any setup that needs wiring changes. That is where DIY projects often go sideways.
Hardwired mirrors also leave less room for improvising than a standard decorative mirror. The bracket has to land level, the housing needs clearance behind the glass, and the conductors need to sit cleanly in the box without getting pinched. If any part of that is uncertain, split the work. Let an electrician handle the power and a glass installer handle the hang.
What if my junction box is off-center
Do not force the mirror to compensate for bad box placement.
If the design gives you room, shift the mirror location and keep it visually centered over the vanity. If the mirror has a fixed wire-entry point or a tight back cavity, move the electrical so the connection lands where the mirror was built to receive it. Stuffing excess wire behind the unit usually causes one of two problems. The mirror will not sit flat, or the wire jacket ends up pressed against the back of the housing.
How high should the mirror go in a bathroom with unusual ceiling lines
Start from the vanity, faucet spread, and the user's sightline. Those references matter more than a sloped ceiling or a soffit line.
In the field, the cleanest result usually comes from centering the mirror to the vanity or sink area first, then checking top and side clearances. If the ceiling shape pulls the eye, adjust by a small amount, but do not sacrifice usability just to chase an architectural line. A mirror that looks centered but feels too high every morning was installed at the wrong height.
Can I mount it horizontally instead of vertically
Only if the manufacturer specifically allows both orientations.
Some backlit mirrors can rotate because the LED layout, defogger pad, mounting rail, and wire entry were designed for either direction. Others cannot. I have seen homeowners rotate a mirror to fit a vanity wall, then find the switch ends up in the wrong place, the light output looks uneven, or the mounting points no longer carry the load the way they should. Check the product instructions before drilling the first hole.
What hardware should never be used
Do not use picture wire, chain, generic D-rings, or leftover wall-hanging kits.
Lighted mirrors need the mounting system the unit was designed around, usually a bracket, keyhole pattern, or strap hanger that spreads the load correctly and keeps the glass tight to the wall. On tile and concrete, the fastener matters just as much as the bracket. The wrong anchor can hold during install and fail later.
My wall is uneven. Can I shim it
Minor shimming at the bracket can work if the wall is only slightly out and the mirror still sits fully supported. Use that carefully.
If the wall has a real bow, dip, or proud tile edge, correct the surface before the mirror goes up. Backlit mirrors do not hide wall flaws well. The glow around the perimeter makes gaps easier to see, and an unsupported corner puts stress on the glass over time.
If you're planning a custom mirror project, not just a standard off-the-shelf install, the advice changes with the wall surface, mounting orientation, and electrical layout. Custom work often involves tighter tolerances and more coordination than homeowners expect.
If you want a backlit mirror installed cleanly, safely, and without the usual guesswork, AmeriGlass Industries can help. Their team handles custom mirrors and precision glass work across Southwest Florida, with the measurement, wall prep awareness, and installation discipline these projects demand.
Planning a backlit mirror? AmeriGlass Industries cuts and installs custom mirrors for bathrooms and gyms across Naples, Fort Myers, Bonita Springs and Cape Coral. Call (239) 426-6884 for a free estimate.