

You've cleared the rack, laid the rubber flooring, and finally carved out a room that feels like a real training space. Then you get to the wall. The mirror looks simple until you start asking the right questions. How high should it sit? What happens if the wall isn't flat? Will clips hold? Can adhesive alone handle a room where weights get dropped and vibration never really stops?
That's where most home gym projects stall out. A decorative mirror and a gym mirror aren't the same thing, even if they look similar in a product photo. In a gym, the mirror has to do more than reflect. It has to stay stable, show your form clearly, survive vibration, and work with the lighting in the room instead of fighting it.
Your Blueprint for the Perfect Home Gym Reflection
A lot of people hit the same point in a home gym build. The equipment is in. The layout mostly works. Then the empty wall starts bothering them because the room still doesn't feel finished, and more important, they can't properly check squat depth, bar path, shoulder position, or stance.
That's not a small detail anymore. Demand for dedicated fitness mirrors has climbed fast. In 2024, over 1.8 million smart fitness mirrors were shipped globally, with around 620,000 installations in the U.S., and 36% of households began adding dedicated mirrors for home training, according to Market Growth Reports' fitness mirror market data. More homeowners are treating the mirror as part of the training setup, not wall decor.
The problem is that most online advice treats all mirror jobs the same. It tells you how to hang glass on a wall. It doesn't tell you how to build a mirror installation that can handle a real gym environment.
Here's the difference. A proper gym mirror installation starts before the first hole is drilled. You have to decide whether the wall gives you the right sightline, whether daylight will wash out the reflection, whether the structure behind the drywall can take mechanical fasteners, and whether the room itself creates constant shock from treadmills, dropped dumbbells, or loaded barbell work. If you're still refining the room as a whole, this resource on budgeting for a new gym helps put the mirror in context with the rest of the build.
A well-placed mirror can also change how the room feels. It opens up a tighter footprint, adds light when it's used correctly, and gives the space a finished look similar to the ideas in this guide on how a glass company can make your home feel luxurious.
A gym mirror should make training easier. If it creates glare, distortion, or a safety risk, it's installed in the wrong place or with the wrong system.
Planning and Measuring for Flawless Form
The cleanest install starts with a tape measure, a level, and a hard look at the room itself. Most mistakes happen before the mirror ever arrives.
Start with the wall, not the mirror
Pick the wall based on how you train. If the mirror is for barbell work, stand where the lift happens and check the line of sight from your eyes to the wall. If it's for mobility, dumbbells, or general conditioning, think about where full-body visibility matters most.
Don't choose a wall just because it's empty.
A window directly opposite the mirror is one of the worst setups. Backlight glare washes out reflection detail, especially in the morning and late afternoon. A roller door can cause the same problem in garage gyms. Overhead single-point lighting has a different issue. It flattens the body visually and hides alignment cues that matter when you're checking knees, hips, shoulders, and spinal position.
According to CF Creation's guide to home gym mirror placement and anchoring, 68% of home gym mirror complaints in 2025 were related to poor visibility from backlight glare or overhead lighting, and the same source notes that optimal placement puts the mirror bottom edge 30 to 60 cm above the floor, with an ideal viewing distance of 1.5 to 2.5 m.
Use a simple planning sequence
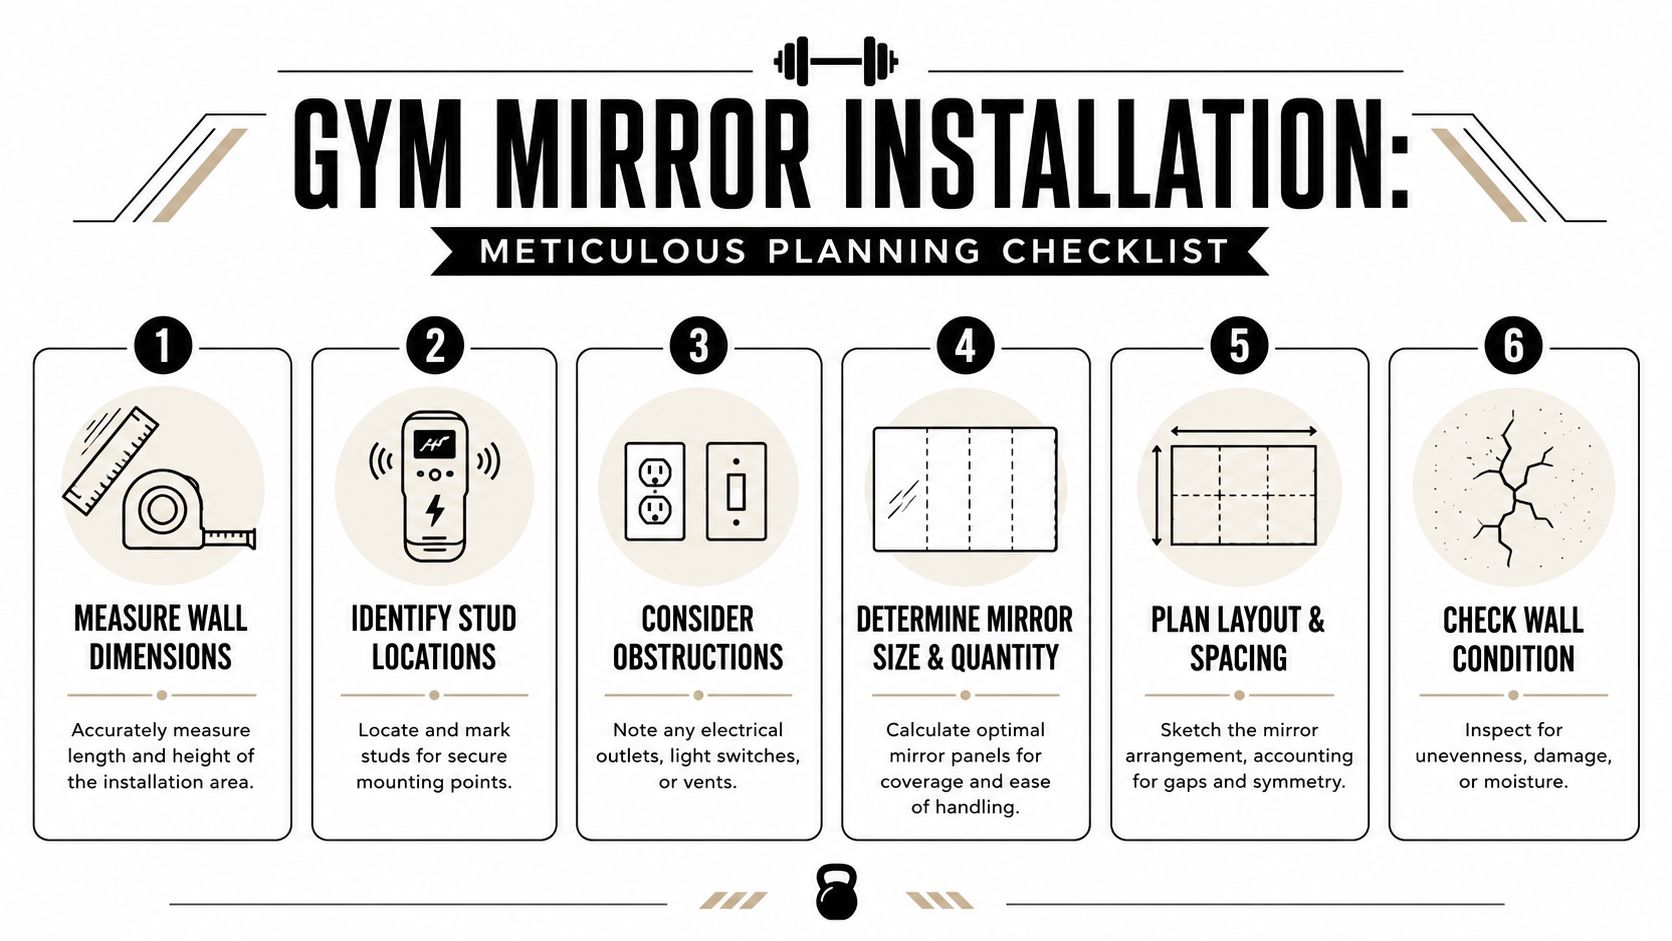
Before ordering glass, check these items in the room:
- Wall dimensions: Measure width in more than one spot. Walls are often out of square, especially in converted garages.
- Stud locations: Mark every stud clearly. These marks drive your hardware layout later.
- Obstructions: Note outlets, switches, vents, trim, and baseboards.
- Lighting direction: Stand in workout position at the times you typically train.
- Viewing distance: Test whether you'll be roughly within that 1.5 to 2.5 m range.
- Bottom height: Use painter's tape to mock up the lower edge between 30 and 60 cm off the floor.
Check visibility before you buy
If the room layout still feels unresolved, a broader ultimate gym layout guide is useful for deciding whether the mirror belongs behind the rack, beside the dumbbell area, or across from the main training lane.
Then get specific. Tape out the exact panel width and height on the wall. Step back. Move through a squat, hinge, overhead press, and lateral setup. You'll see very quickly whether the planned mirror catches what you need to see.
If you want a custom layout or need a precise field measurement before ordering, it's smarter to request a custom glass quote than guess and hope the dimensions work on installation day.
Practical rule: If the mirror location looks good only when the room lights are off or the blinds are closed, it's the wrong wall.
Choosing the Right Mirror and Hardware
A common and costly error occurs when people shop by appearance first. For a bedroom, hallway, or powder room, that approach might be fine. For a gym, it isn't.
Decorative mirror versus gym mirror
A decorative wall mirror is chosen to look good in a low-impact room. A gym mirror has to tolerate movement, occasional shock, cleaning, and long-term mounting stress without flexing or turning the reflection wavy.
In practice, that means the mirror should be selected as a glass installation component, not just a furnishing.
Here's the trade-off in simple terms:
| Mirror choice | What works | What doesn't |
|---|---|---|
| Standard decorative mirror | Fine for low-risk spaces with little vibration | Poor choice near weights, machines, or active training zones |
| Custom-cut gym wall mirror | Better fit, cleaner layout, more control over seams and wall coverage | Requires accurate measuring and better install discipline |
| Safety-backed mirror | Adds protection if the glass is struck or cracks | Costs more than a basic panel, but it's often worth it in active spaces |
A gym mirror also needs enough rigidity to stay visually true once mounted. Thicker glass generally performs better than flimsy mirror stock because it resists distortion and feels more planted during handling. If you're comparing finishes, edge work, and custom configurations, this overview of mirror and specialty glass styles is a useful place to sort through options.
Hardware matters as much as the glass
I see a lot of installs where someone spends good money on the mirror and then tries to save the project with bargain hardware. That's backward.
A reliable gym mirror installation usually relies on a mechanical support system. The most common options are J-channels, bottom channels with clips, or clip systems designed for heavier wall mirror applications.
Here's how they compare in the field:
- J-channel at the base: Good for carrying the mirror's dead load and creating a level starting line. It works well when the floor and wall conditions are reasonably predictable.
- Mirror clips: Useful as retention points, especially at the top and sides. They must be installed carefully so they hold the panel without stressing the glass.
- Mirror mastic: Helpful as a supplemental bonding material for even support. It should support the installation, not replace the structural hardware.
- Anchors matched to substrate: Drywall, masonry, and wood-backed walls all need different fasteners. There is no universal screw that solves every wall.
The wrong hardware usually fails slowly, then all at once
The early signs are subtle. A slight rattle. A tiny amount of movement. A panel that doesn't feel fully seated. Then someone drops a dumbbell, the wall vibrates, and the weakness gets exposed.
If the mounting system would be questionable in a commercial studio, it's questionable in a garage gym too.
For small, light mirrors in low-impact rooms, homeowners can sometimes get away with simple clip kits. For larger gym panels, especially across a rack or lifting zone, hardware selection has to match the environment.
Preparing Your Wall for a Secure Installation
A gym mirror installation is only as sound as the wall behind it. If the surface is dirty, soft, uneven, wet, or loosely attached to framing, the mirror inherits every one of those problems.
Check structure before finish
Start with the substrate. Drywall in a spare bedroom is one thing. Drywall in a garage that has taken moisture swings, patchwork repairs, or repeated impact is another. Press on suspect areas. Look for soft spots, bulges, old anchor holes, and seams that telegraph through paint.
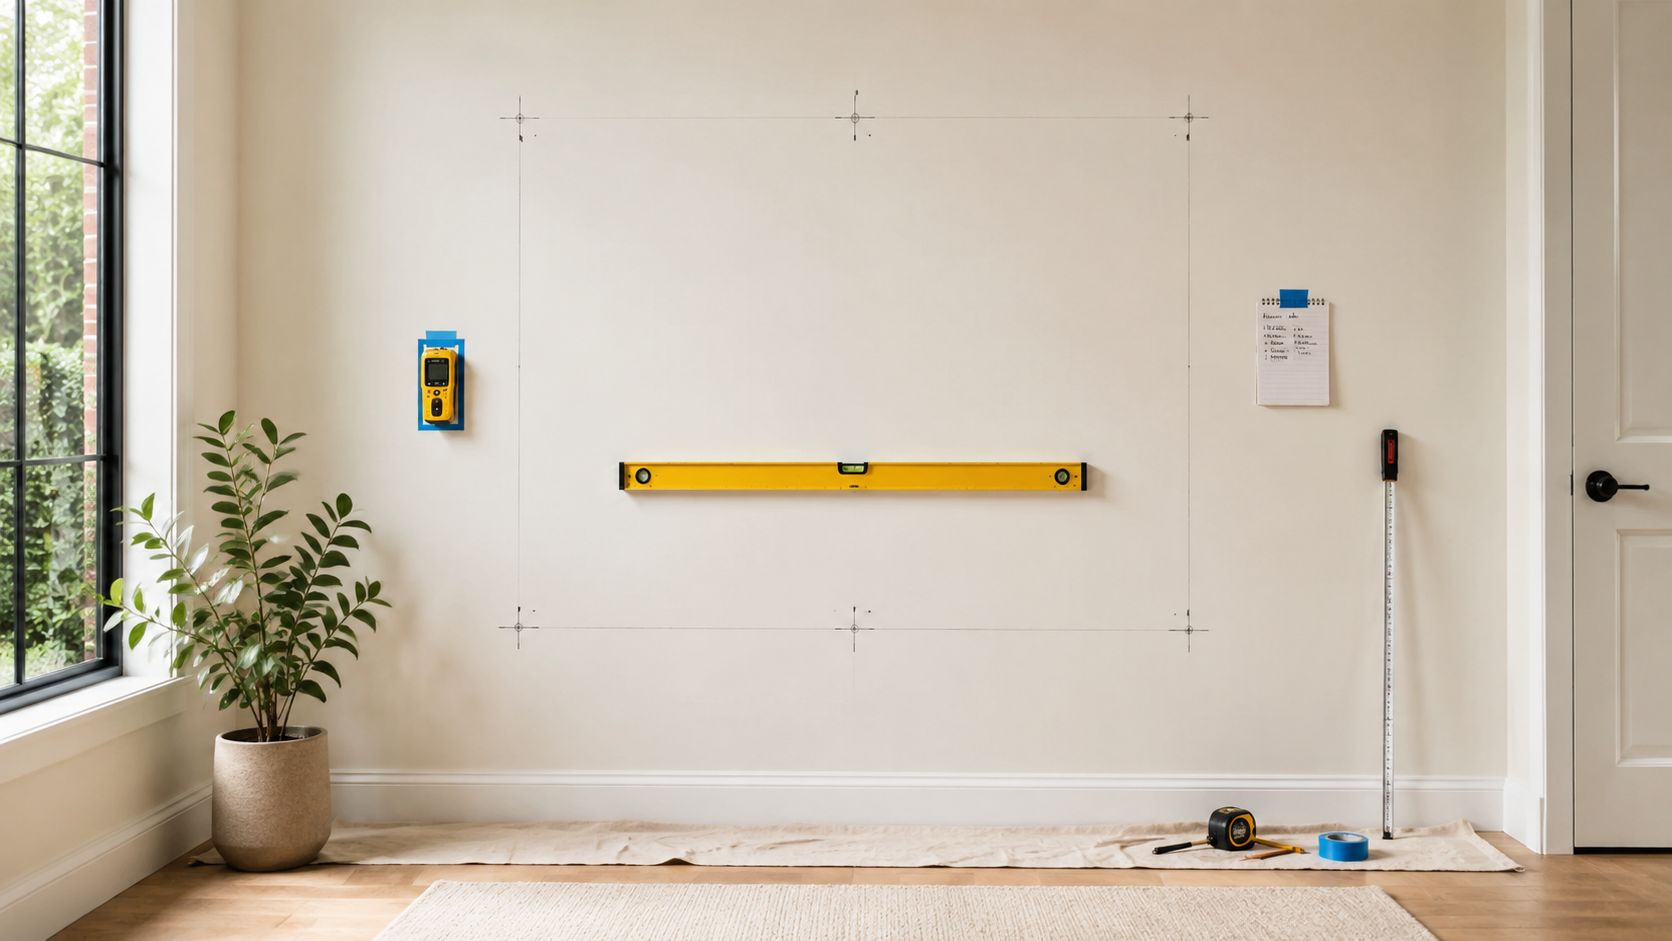
Then locate and mark the framing. Stud marks should be clear enough that you can still find them after layout lines, patching, and dust get involved.
Wall prep should include:
- Stud verification: Use a stud finder, then confirm manually where needed.
- Surface cleaning: Remove dust, residue, and chalky paint.
- Flatness check: A long level or straightedge will show bows and dips.
- Patch and cure time: Fill voids and let repairs dry fully before hardware goes up.
- Moisture review: Don't mount onto a wall with active moisture issues.
A lot of glass failures that get blamed on hardware were wall failures first.
Gather the right tools before lifting glass
You don't want to be halfway through the install and realize the bit is wrong for masonry, or the screws don't match the anchor, or the level is too short for the channel.
Typical tools for a careful install include a stud finder, long level, tape measure, drill and correct bits for the wall type, driver, layout pencil, shims, PPE, and clean support pads for staging the mirror. If the project involves custom-cut glass or other made-to-measure products, it helps to understand the range of custom glass products available before finalizing the install plan.
This walkthrough gives a visual sense of staging and setup before lifting the mirror:
Don't skip dry layout
Before any mastic or final fasteners, dry-fit the hardware positions and check the reveal lines. If multiple panels are going side by side, verify seam spacing and make sure the clips won't create visual chaos across the wall.
That dry run often exposes the problems that online tutorials don't mention. Maybe the baseboard pushes the channel out. Maybe the stud spacing doesn't line up with your original panel plan. Maybe the wall bows just enough to require shimming.
Those are fixable problems. They're only dangerous when nobody checks for them.
The Installation Process Done Right
Most risky advice online comes down to one shortcut. People try to turn a structural installation into an adhesive project.
That's the wrong approach for a gym.
According to Mr. Handyman's gym mirror installation safety guidance, adhesive-only mounting is categorically unsafe for gym mirrors, because gym conditions degrade adhesives and can lead to catastrophic failure. The same source states that all gym mirrors require mechanical fasteners anchored into studs every 400 mm, and adhesive should be supplemental only.
What DIY videos often get wrong
A lot of quick tutorials are built around appearance. The panel looks flush. The seams look clean. The installer taps it, smiles, and moves on.
What they don't address is vibration.
In a real gym, walls don't live in calm conditions. Treadmills transmit motion. Adjustable dumbbells get set down hard. Bars get reracked unevenly. Even if you never drop a loaded deadlift, the room sees repeated low-level shock. Over time, that stress works on weak hardware layouts, poor anchoring, and adhesive systems that were never meant to stand alone.
A mirror that feels secure on installation day can still be a bad install if the retention system depends on glue more than structure.
The professional sequence
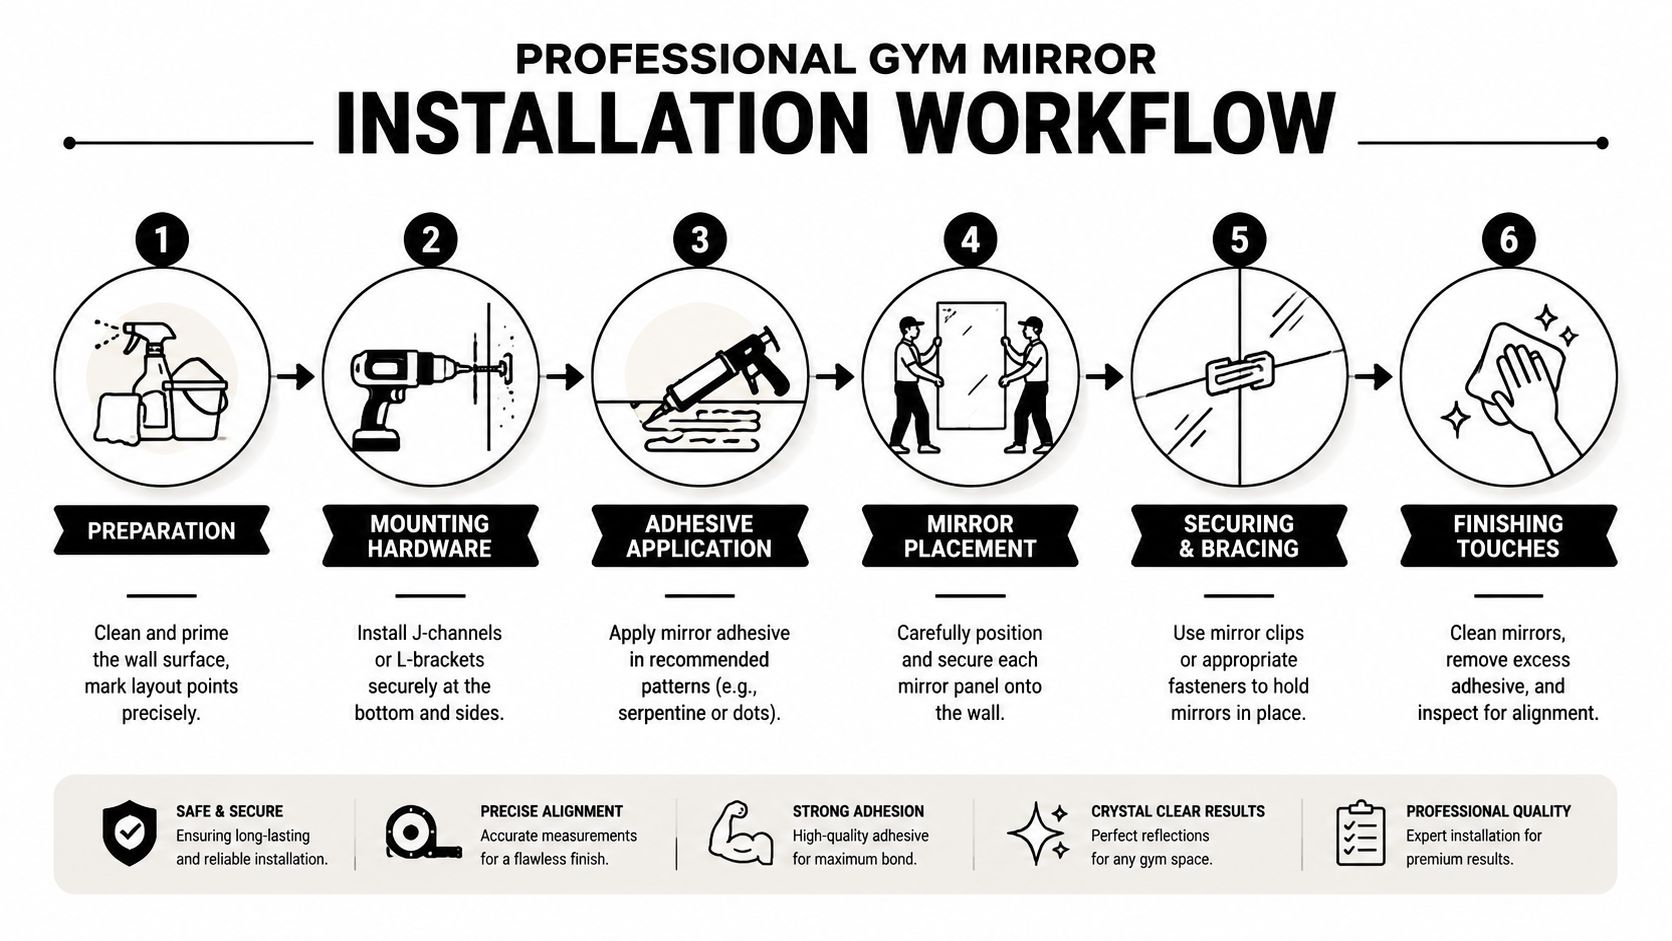
A gym-safe install usually follows a hybrid method. Mechanical supports take the load and retention duty. Mirror adhesive or mastic helps distribute contact and reduce unsupported areas against the wall.
A sound sequence looks like this:
Lay out the baseline
Mark the bottom line dead level. If you're using a J-channel, this line controls the whole installation.Anchor hardware into structure
Bottom channel, side retention, or clip points need to land in framing or appropriate structural backing. For heavy panels, fastener spacing matters.Apply mirror-safe mastic correctly
Use it as supplemental support, not the main holding force. Keep the pattern consistent and appropriate for the panel and wall.Lift with control
Large mirrors are awkward, not just heavy. Two people are often the minimum. The panel needs to be guided into place without twisting or edge impact.Set and secure
Once seated, top clips or side retainers should hold the panel without overtightening. Glass should be restrained, not pinched.Inspect before cleanup
Check alignment, contact, clip pressure, and any movement at the wall.
J-channel versus clips in practice
The best hardware setup depends on wall conditions and panel design. Here's the practical difference:
| Hardware approach | Best use | Main caution |
|---|---|---|
| Bottom J-channel with top clips | Clean look, strong baseline support, common for larger wall mirrors | Must be perfectly level or every panel above it shows the error |
| Clip-focused install | Works where channels aren't ideal or where layout is tighter | Requires careful placement to avoid point stress on glass |
| Hybrid with channel, clips, and mastic | Best overall control in active gym spaces | Takes more time and demands accurate stud layout |
Common failure points
The failures I worry about most aren't dramatic on day one. They're the quiet mistakes.
- Missed studs: Hardware lands in drywall instead of structure.
- Bad spacing: Support points are too far apart for the panel and room conditions.
- Overtightened clips: Glass gets stressed at the edge.
- Uneven walls: The mirror bridges a hollow spot and flexes when the wall moves.
- Adhesive-first thinking: The install looks fine until environmental stress catches up.
When the install should stop
If you find hidden moisture, crumbling drywall, a wall that's badly out of plane, or framing that doesn't support the planned layout, stop the installation. A gym mirror isn't the place to force a fit and hope.
Good glass work isn't just about getting the mirror onto the wall. It's about knowing when the wall isn't ready for glass yet.
When to Partner with a Pro in Southwest Florida
There's a point where gym mirror installation stops being a weekend project and starts becoming a glass handling job with real consequences. That point usually arrives sooner than people expect.
A single panel on a clean, solid wall is one thing. A multi-panel install across a lifting area, on a wall that isn't perfectly flat, in a garage with humidity swings and active equipment, is something else entirely.
The market has moved in that direction too. According to Deep Market Insights' fitness mirrors market research, the U.S. smart fitness mirror industry generated approximately USD 96 million in revenue in 2024. That growing demand supports the need for professional installation services built around safety, precision, and longevity.

The real DIY trade-off
Most homeowners don't struggle with effort. They struggle with hidden variables. A wall that looks straight may be out enough to affect contact points. Stud spacing may conflict with the seam layout. Lighting may make the finished mirror less useful than expected. One chipped edge during handling can end the job before it starts.
That's why the DIY question shouldn't be “Can I mount a mirror?” It should be “Can I measure, stage, support, lift, align, and secure this panel correctly for a gym environment?”
If the answer is maybe, the project is already in the danger zone.
What a pro handles that most DIY plans miss
A specialist brings more than labor. The value is in identifying problems before the glass is committed to the wall.
A professional installer typically accounts for:
- Wall condition: Detecting bow, weak drywall, moisture issues, and problem seams.
- Exact measurement: Sizing panels to the actual field conditions, not idealized room dimensions.
- Hardware selection: Matching the mounting system to drywall, masonry, or mixed substrates.
- Safe handling: Moving large polished-edge glass without twisting, corner strikes, or rushed placement.
- Finish quality: Keeping seams straight, reveals consistent, and clip pressure correct.
Southwest Florida homes add another layer. Garage gyms, lanai-adjacent rooms, and converted bonus spaces often deal with heat, humidity, and construction tolerances that aren't as forgiving as a climate-controlled interior wall.
In this region, the room itself can be part of the installation problem. Heat, humidity, and wall movement don't care whether the mirror looked fine on day one.
Large mirrors and custom cuts deserve extra caution
This is especially true if your mirror layout runs around switches, outlets, trim, or equipment clearances. Any notch, custom edge, or nonstandard wall condition raises the stakes because replacement isn't as simple as picking another stock panel off a shelf.
Homeowners in Fort Myers, Naples, Bonita Springs, and nearby areas also tend to care about finish quality. If the room is part home gym and part designed interior, the expectation is clean lines and a polished result. That's the same reason people often hire specialists for architectural glass details such as frameless shower door installation in Fort Myers, Florida. Precision changes the final look, and in glass work, precision also changes safety.
When hiring a pro is the right call
If any of these apply, bring in a specialist:
- The mirror is large or multi-panel
- The wall has texture, bow, patchwork, or uncertain framing
- The space is a garage or high-vibration training room
- The layout needs custom sizing or obstacle cutarounds
- You want a clean, virtually unbroken finish without trial and error
You can do plenty of home projects yourself. Gym mirror installation just isn't the place to learn structural glass handling by making mistakes on your own wall.
AmeriGlass Industries handles custom mirror and glass installation across Southwest Florida with the kind of measurement, wall assessment, and finish discipline this job demands. If you want a gym mirror that looks sharp, reads clean during training, and stays secure over time, contact AmeriGlass Industries for a professional consultation.